Wednesday, February 23, 2011

Book Shelf Design

Having trouble with your book shelves? Your not alone!
Book shelves can be somewhat of an enigma to many. So the best way to begin decorating them, is with them empty.  If the shelves are adjustable, try to get them,to even heights.  (This is especially necessary if you have multiple bookcases in a room. This allows you to start fresh and adjust as needed.)
       

The next step is to gather like items.  I start with a color theme.  If you are going for a neutral look, then I like to let the items stand out, not the books. So I choose books very similar in color . In this example it would be tan and brown. (In this photo, I wanted a neutral look with tans and browns and ended up turning all the books around to reveal their pages..this way my pictures and items were the showcase.)
          
Then, the next step is accessories, (pictures and personal mementos.)  I like to have only one metallic finish on my shelves and one color of wood finishes for picture frames or accessories.  This way the view to the eye is not cluttered. Try and group like items together, and in odd numbers if possible.  (I usually stick with 3’s so it does not get to crowded/cluttered). The other trick, especially for a neutral look, is to get all personal photos in like colors; ie, black and white/sepia tones or all color.
          
Then, have fun! This is not a one step process. You will put some things in and then change your mind. Tweaking is part of decorating and as your life evolves so will your decorating. So get those favorite things out and show off those shelves!

*This is part of Get Your Craft on Tuesday at Today’s Creative Blog.

Monday, February 21, 2011

Pantry Spring Cleaning & Organization


Spring is near and this conjures up a feeling or a desire to refresh and renew.  For most of us, that means cleaning and organizing.  Today I cleaned out my pantry.  I do this at least once a month.  My pantry to me, and I think to many other people, can be overwhelming.  Where do you put everything?
I came up with a system that works for me and maybe you too! 
I have my pantry in zones, much like the way I decorate.  Zones make everything easier!
So I came up with a basket system for the two lower shelves and organization by like items and frequency of use, for the other shelves. 
  • Everyday items close at hand and at eye level or my children's eye level.  Depending on the age of your children this can be a nice tool. This is very convenient when my boys ask if they can have a particular snack and they can reach it…if Mom agrees!  
  • A basket for chips, pretzels, snack bars etc. This way those bulky boxes can be eliminated and those pesky bags seem organized after they are opened.  I hate clutter and clutter to the eye is just as bad. 
  • Dried fruit and nuts usually come in smaller packaging. Therefore, they fit in a smaller basket. 
  • A breakfast basket, that holds cereal, oatmeal, breakfast drink mixes, breakfast bars or supplements for smoothies. 
Then, the pasta, rice and other dinner type options, are organized on the shelf above the baskets. They are organized in like groups for an easy grab at the dinner hour.
The top shelf houses items I use less often. In my case, these items are baking items such as; flour, sugar, oil & cookie cutters.  In the pictures I have posted of my pantry, you will notice I have labels on the cookie cutters, flour and sugar containers.

~You can make your own labels in a Word type document and print them out on printable labels or, like I did, paste or tape on. This is a great opportunity to personalize your pantry, (or any other item you would like labeled), with scrapbook paper or keep it simple and mono-chromatic.
~The containers for the flour and sugar are from Wal-Mart, they were very inexpensive and seal all your sugar and flour.
~The plastic containers are from Wal-Mart and The Container Store. I know what your thinking, The Container Store?  Some things are a tad pricier, but the clear plastic containers have great lids that stay closed and are actually very reasonable. They come in many sizes. They are usually displayed close to the entrance of the store.
 
The canned items and spice storage side of my pantry, is organized in the same fashion.
                 
Common everyday items such as canned goods and spices are all on the bottom two shelves. The items that are less commonly used, are on the top shelves.
The rest of the pantry, has every square inch  utilized if possible. 

  • A wooden box for take-out menus that I found at Ross for around $10.  This is a great way to keep those menus close and organized. 
  • Recycling instructions, (ie. items that can be recycled), are listed and framed above the trash receptacle.  This is so visitors and little boys, know what is recyclable.
  • A decorative hook for aprons.
  • A cork board, between the can shelves, houses emergency contact information for sitters and the monthly school lunch menu.
  • Under the can shelves, I have a place to hang the boy’s lunch boxes off the ground.
You may also notice, tucked to the right of the trash receptacle…
A tower of paper towels. I love this!
I can shop at Costco and get the deals and not have paper towels in my garage or elsewhere, other than the kitchen, where I use them most.
*My favorite pantry tip…
  • A chalkboard that I made from a cabinet door.  I took the hinges off of the cabinet. I painted the center panel with chalkboard paint.
~You can find the chalkboard paint at any hardware store in many colors.  You could also paint on magnetic paint and then paint chalkboard paint over it.  The message board will then work for magnets and chalk.
I can quickly make a list of items needed as they run out.  This saves me time in making a shopping list.  No guessing or struggles to remember what is needed for those trips to the grocery store.
I hope this helps and inspires you!  Organizing things we use everyday can save us time and money.  If you can clearly see what you have and don't have, then there are no duplicates and nothing wasted.
~ Happy Organizing!
This is part of Get Your Craft on Tuesday at Today’s Creative Blog.

Sunday, February 20, 2011

Winter Germ Busters!

The weather is warming up here in Texas 78* today! Time to get rid of those winter germs.  We have had a round of everything from the stomach virus, colds and flu run through our home this winter. Buying the disinfectant sprays and wipes can be expensive and not to mention, what if you are quarantined ...what do you do when you run out?

Here are some great tips I have learned form research online and a great network of family passing along tips.

Tip #1- Mix in a spray bottle, either new or reuse an old windex type bottle, 1/4 of the bottle with distilled white vinegar, a splash of rubbing alcohol and the rest water.  This is a great all purpose cleaner and deodorizer.  Now the vinegar can be off putting, but the smell does dissipate rather quickly. Full strength vinegar will kill bathroom germs too.  This is a natural way of deodorizing and disinfecting. Not to mention, it's cheap! Rubbing alcohol is under $2 at most stores and distilled white vinegar is inexpensive too and most homes have it around. Rubbing alcohol is great in bathrooms for mirrors and leaves virtually no streaks.  I use this mixture for mirrors, glass doors, counter tops etc.. You can sprinkle some baking soda on those surfaces that need scouring and spray the solution.  This is a great way to remove grime naturally without a harsh abrasive.

Tip #2- Bleach and water.  This in a spray bottle will kill most stomach viruses and flu. Every bleach bottle has instructions for cleaning and disinfecting. More is not necessarily better, so carefully read the directions on proper proportions. I have sprayed this on mattresses, furniture, counter tops, toilets and all bathroom fixtures. The smell may be off putting but grin and bare it, it is better than passing those horrible viruses.

*Be careful when spraying on furniture of how much bleach is in the bottle...you don't want to bleach anything!

Happy Winter Germ Busting! I am looking forward to a germ free home and Spring!

French Country meets Neoclassical

 New Home Construction: I designed this home with collaboration from the homeowner.  This was an exterior and interior design project.  I did color selections, flooring and lighting.  I also helped with new furniture selections and placement of furniture and accessories. This is a 7K sqft. home and I will add more photos later and better quality.  One photo that was left out was the custom wine cellar door and gas lamps flanking either side of the wine cellar entrance. The exterior of the home has beautiful gas lamps as well.  I hope you enjoy this project as much as I did!

Spring is near!

I am feeling the warmer air here in Texas and I can already see I am feeling the reorganizing or "Spring Cleaning" itch!

I get asked all the time why I am so organized!... and NO...it is not because I am Obsessive Compulsive! I really just feel that if my home is disorganized, then A. I will end up waisting valuable time searching for one item and B. I just FEEL disorganized, when my home is disorganized. Then, I end up feeling angry, stressed and depressed.

So, having answered the why... now the how!

Start in one room and make piles: giveaway, trash, and "other rooms". This way you are not venturing from room to room feeling overwhelmed and frustrated. Not to mention when you do finish the 1st room, it is instant gratification! Get a trash bag for trash and one for give away or a box is even better for giveaway items.  Don't forget to label which bag is which, if you are using bags.

If it is a bedroom, I recommend going through your clothes and deciding what fits and what doesn't.  If it does fit, when did you wear it last?  If it has not been worn in over 2 years, giveaway. If it is damaged, then more than likely, it is a throw away or fabric that can be salvaged.  Hold onto that item for crafts if you are the crafty type. For shoes, same process.

For office spaces, this time of year is crucial to be organized. Tax season is upon us and you need to get those documents in a designated folder and set the folder in a place that is easily accessible.  Go through your paperwork and purge or file.  This way you are ready for the new year and so are your files! Be sure that any private documents you are purging get shredded by a home office shredder or look around town for places that will shred them for you. A home office shredder is found at wal-mart for as low as under $25.00 online. They are nice to have on hand.

Now all those items that are in your giveaway pile, look over and decide if you want to sell on craigs list, put in a home yard sale or give to a local charity.  Some of those charities will even pick it up at your home and you can get a tax deduction for donations.  Craigs list or a home yard sale, is a great way to get extra decorating cash or help out with those unexpected taxes.

I also have a trick for you Moms out there. I let my boys go through their toys and this is not always easy...they get to decide what is no longer played with and needs a new home.  Whatever they get for those items at the garage sale or online, they get to keep and get a new toy or game. I do however limit them to 1 item each so I am not recreating the number of toys given away, LOL! This really does help teach them to organize and not hoard items.  I think all of us tend to think "I'll use it someday", but it can be overwhelming when those "someday items" takeover the home!

So get those trash bags, yard sale bags, giveaway bags and get sorting and organizing!

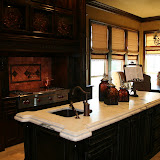
Have fun and be sure and look at my latest pictures of some homes I have decorated and design ideas for the Spring Holiday's. I will have more to come!